
Norton Dolls Head and Upright Gearbox Shells - Repairs and Modifications
- Andy Marks

- May 18
- 4 min read
Updated: May 19
A common problem with Norton Dolls Head and upright gearboxes is cracking or breaking around the upper mounting ears. This guide covers our preferred repair method, including modifying the top mounting arrangement, repairing worn pivots and machining new mounting components to prevent the problem returning.
Why Norton Gearbox Mounting Ears Break
Cracked or broken mounts are usually caused after the gearbox has come loose and been allowed to rattle. This wears the bottom pivots and the inside of these ears, when it is tightened back up again the ears are pulled in too far causing one or both of them to break off - they are not designed to bend.

Kingpin Components Preferred Fix
Although it is common to see these welded back together and refitted, we prefer to go one step further and modify the top mounting arrangement to avoid a repeat of the problem. This involves boring the drive side ear out and making a special bolt which passes through the bore and clamps up tight against the other ear. The modification prevents the ears being pulled together when the gearbox is tightened in the frame.

Machine the Clamping Face
Clamp the gearbox securely on the gasket face. With this box we used some parallels to lift it off the bed, allowing us to leave the studs in place.
Now use a side and face cutter to skim the inside to the bottom ear. This will be the face that is clamped up against the frame. Remove as little as possible as anything taken from here will move the gearbox over and have a knock on effect with your chain line. You could shim it back into position but with this gearbox we only had to remove about 0.015" so won't worry about shimming.


Click on the images for captions
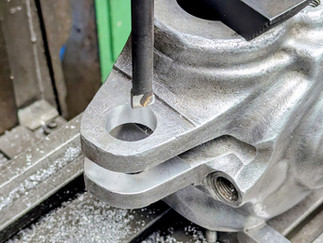
Bore the Mounting Ears for the New Clamping Bolt

Once the clamping face is smooth, but without removing the shell from the milling machine, bore the top ear out to 1" as per the drawing at the top of this section. On this gearbox we decided to bore all the way through and open the bottom ear out just enough to get it round again - we ended up taking about 0.010" out and we are making a new bolt so will make the shank oversize.


Click on the images for captions
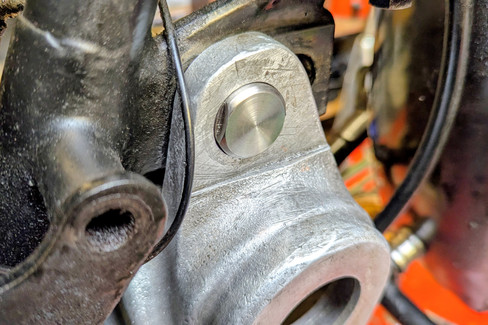
Manufacturing the New Bolt

We made the new bolt, washer and nut in stainless, because we make most things in stainless for our own bikes! It is very important that both the shank and head are turned concentric with each other and are a snug but sliding fit in the gearbox shell. I've done the drawings with tolerances but, basically, the closer the better without it going tight.

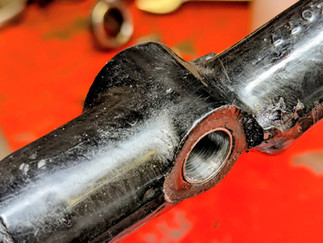
Repairing Worn Gearbox Pivots
If the gearbox has rattled about the bottom mounts will be worn oval as well. Returning these to a good fit will also help to prevent future problems.
Bore the Lower Pivot Out to Take Bushes
While the gearbox is set up on the milling machine (we did this at the same time as the milling work on the top mounts) we bore the lower pivot out to 5/8" and skim the top and bottom faces to get them square. In this case we also remove about 0.080" from each surface.


Click on the images for captions
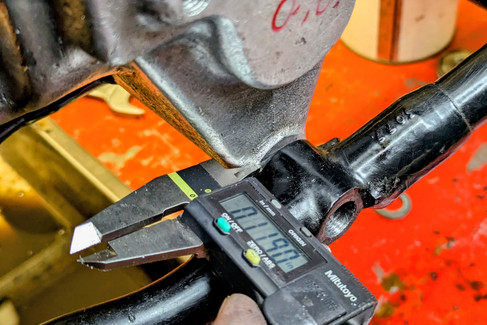
Test Fit and Measure Top Hat
Next job is to clamp the gearbox in the frame using the new top mounting set up and measure the gap between the gearbox and the frame on the bottom. Even if you know exactly how much you removed I would advise you to do this step - and don't forget to measure each side separately as they are rarely both the same.


Click on the images for captions
Manufacture and Fit Top Hat Bushes

Make a pair of top hat bushes to bring the ID back down to 1/2 and fill the gaps on each side. I would recommend making the OD a size for size fit and using Loctite to hold them in place. There isn't a lot of 'meat' around them and the gearboxes can crack if you press them in with too tight a fit.
On this gearbox we also left the ID slightly undersize and reamed it after they had been fitted.
Bushing Frame Pivot
The 1947 Model 18 that was used for all of these images had rattled about so much the frame was worn - we used an expanding reamer with a pilot to get the holes round again, then made up a pair of steel bushes to press in and return the frame to 1/2".


Click on the images for captions
Summary
Wear in the gearbox mounting points is one of the main causes of cracked Norton gearbox shells. Repairing the worn pivots and modifying the upper mounting arrangement helps prevent the problem returning and provides a much stronger mounting system than the original design.
Return to:
Comments